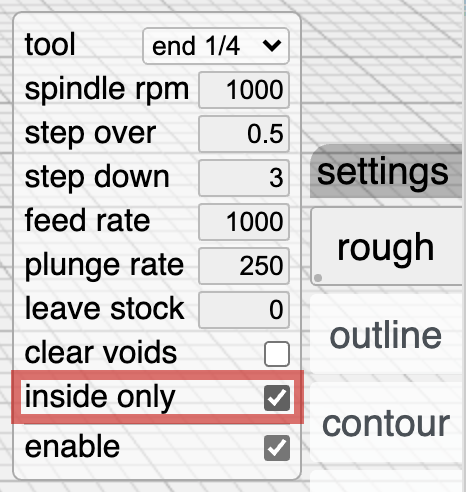
When I do a simple roughing of a pocket (3x2x1 block with a 1 inch square pocket that is 1/16 deep), it also includes a tool path around the outside of the block. I can best describe it as a face mill or end mill operation. I only want the roughing path. How do I delete the outside tool path?
By the way, I’m a PLTW teacher in SoCal teaching the CIM class online during this C19 time. Most of the kids are using Fusion360, but enough are using OnShape on a Chromebook that I’m learning Kiri-Moto - I like it so far. Learning more every day!!!
Hi @KingHighMartin and welcome! You can disable clearing the outside of the part during roughing by selecting “inside only” as pictured here. Future changes will split roughing into more discrete operations as well as allowing for re-ordering of operations.
Thanks, Stewart - I had tried that, but my mistake was not RE-slicing after changing it to Inside Only. That works now.
Next question:
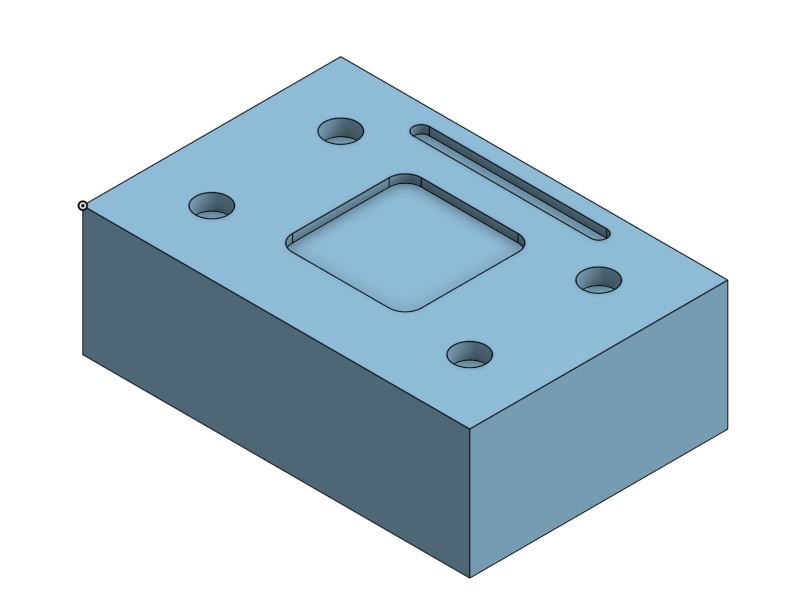
How do I get multiple operations inside the same file? I have a block (below) with a pocket and four holes, all roughed or drilled with a 1/4 end mill. I also have a slot 1/8 wide that I want to ‘rough’ with a separate operation and a different tool (1/8 ball mill). How can I get all of those features machined within the same ‘file’?
As of right now, if you want to perform two of the same operation that requires different tools, you will have to export that gcode separately. As I alluded to, that will change in the future. For any hole operations that match a tool size, just enable the drill operation and set the proper tool and settings. You can export a roughing + drilling operation in one gcode file with different tools, just not two roughing operations with different tools.
In the specific case you have above, you could cheat a little and handle the roughing and drilling with 1/4" and enable outline with a 1/8" tool for the slot. If the slot is exactly 1/8", it’s possible the polygon offsetting will cancel out and not “see” the slot with a 1/8" tool. This is an area I’m working to improve. If you oversize the slot every so slightly or undersize the tool, it definitely works.
Yes, I can do the pocket and holes in the same operation - already figured that out. I’ll be teaching high school students with no experience how to do this, so instead of getting complicated with the outline and such, we’ll just do two files and copy-paste the code into our milling software (CNCMotion by Intelitek).
So, it seems that I can’t do a true ‘slotting’ operation with that part. In Outline mode, it makes several passes. With the Rough operation, it won’t see the tool size, and it won’t make the slot. (I tried a .1245 diameter ball mill - several passes. I enlarged the slot, making it .25, and with Rough, a .25 end mill won’t work.) I suppressed the pocket and drilled holes to concentrate on the slot. Just can’t get it quite right.
Not sure what to try now. I don’t like the several passes with Outline - almost 300 lines of code!
You’re running up against something I’m on the middle of working on. How do you detect a slot exactly the same size as the tool? It’s not straightforward in lots of cases. But I have some prototype code that will go into the development channel soon.
In the meantime, you can try an inside-only outline operation and enlarging the slot to 0.01mm larger than the tool or, alternatively, undersizing the tool by 0.01mm from the slot size. Then set the step-down to just above the bottom of the slot and set the z-bottom to just below the slot. That should constrain the operation. Gross, but it should work.