Is there enough space between the objects? Too much?
Are the tabs big enough?
workspace_Clamp_A.kmz (170.8 KB)
Thanks!
Is there enough space between the objects? Too much?
Are the tabs big enough?
workspace_Clamp_A.kmz (170.8 KB)
Thanks!
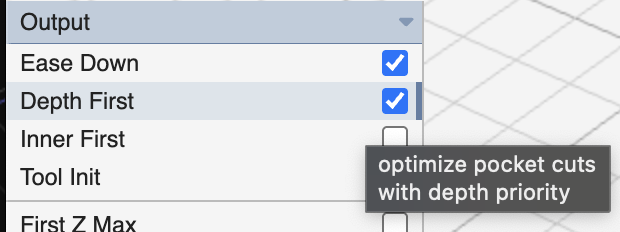
looks like plenty of space between. tab size depends on material. is there a reason you’re not using depth first? it would save 35% of the milling time.
Material is 6061 Aluminium.
‘Cause I don’t know about depth first.
you’re making small steps. I think the tabs are probably ok. do you use double-sided tape between your stock and wasteboard? I usually use 3mm polycarbonate as a sacrificial layer under my stock.
In this case, I’ve screwed the aluminum down to the bed of my Carvera Air. The default waste board that came with the machine is 3mm mdf.
I’ll try Depth First and see how it changes the animation.
I’m expecting new 1/8“ end mills tomorrow. I hope they all survive actually cutting the aluminum. Lost 3 last time, but this new slicing process should work.
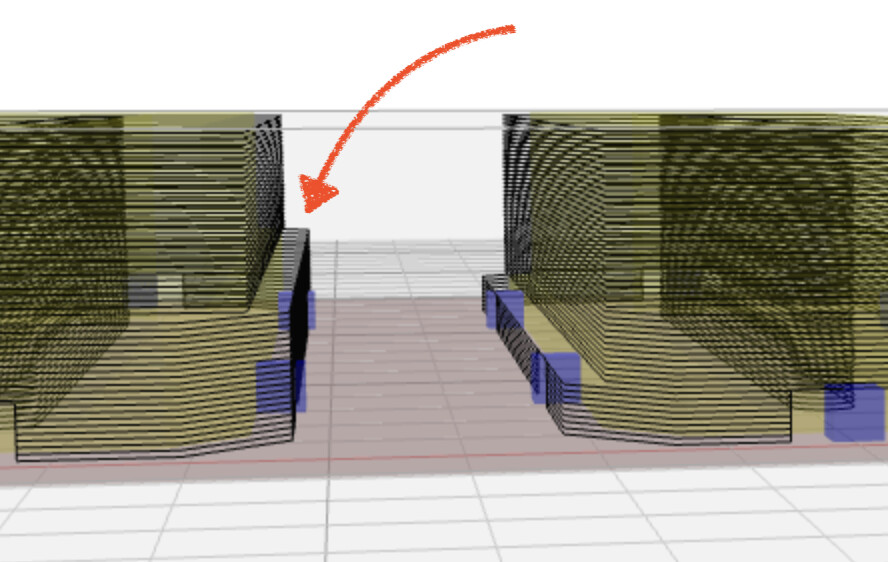
your bits are breaking if you’re running this job with this setup. the outline does a step out near the bottom which will cause your tool to crash into uncut material. I’m providing an updated workspace that runs a 'wide cutout` variant of outline that clears that material before running this outline which is meant to be a finishing pass.
typically this would be done as a roughing operation + outline operation where the roughing pass would clear the area “above” the the lower ledge. in some cases, like this one, you can use a modified outline to achieve the same results.
there are tons of other ways to tackle this problem: pocket + outline or trace + outline, etc. the only time outline does the job alone is when your part is a simple 2D extrusion.
workspace_Clamp_A_v2.kmz (356.3 KB)
I don’t use tabs for flat material anymore, I use painterstape on the stock and on the spoilboard and glue the backs together with CA glue, then clamp the stock, be sure to make contact with the tape on parts that will come loose.
Painterstape comes loose realy easy when pulled from the stock but it’s really good for lateral friction that the CNC machine creates. sometimes I use the double sided tape that Makera sends witht he Carvera Air, but that stuff is way too sticky and destroys your spoilboard when you try to pull it loose.
Those claps are annoyingly high, I think you are better off using the clams that I have uploaded to printables: Carvera Clamp by Da BIG One | Download free STL model | Printables.com
I also have some printable “spoilboards” for lathe and Anchor2 vice operations to keep your bed clean ![]()
I’ve looked at your workspace, I would pocket the insides, not outline it, also pocket the ledges, just outline the object itself.
Thanks for the suggestion.
I’ve looked at your clamps. I could 3D print mine also but am using this as a learning exercise in working with aluminum.
My clamps are that thick on purpose because I will be machining 12+ mm thick exotic woods. The thinner clamps don’t hold as well in that case because of the steep angle induced.
Thanks, I am aware of using tape and CA glue. I’m not yet at the stage of machining the small parts I plan to make and may use the tape method then to save having to remove the tabs. However, I need to have a clean cut at the bottom edges and wonder if the grooves cut into the spoil board would make that method less successful due to the reduction in surface contact for the tape. And, then there’s the potential problem of removing the tape from the parts, which will be tiny. I’ll experiment with some scrap wood before deciding.
Stewart,
I notice that the first outliner cuts the final shape of the larger (shadow line?) area of the clamps. And then the second one cuts the finished shape including the groove. That’s cool!
Thanks
Try the workspace that Stewart sent above. It seems to work very well and is easier to set up.
Stewart,
I don’t see a wide cutout set up in the first outliner. So is that achieved in the setup because the major dimensions are larger than the material being removed to create the lips?
On the funny and slightly sarcastic side - I don’t have the claps and the only clams I like are in chowder! LOL ![]()
LOL, I like to be inconsistently wrong ![]()
I didn’t notice the typos, I would have corrected them otherwise. I’m a little dyslexic and I know when I don’t work hard to check my spelling I make mistakes, but this time I wrote a quick reply… burnt! ![]()
there is a chance that the inside of the pockets will come flying when you just cut out the sides, that’s why I would pocket them.
workspace_Clamp_A-pocket.kmz (577.0 KB)
easiest solution to all of this is a simple rough + outline since the roughing will clear the pocket (or at least it has that as an option).
I understand completely. I’m not dyslexic, but my wife says I’m weird!
Man, there is lots to learn about this! That’s why I do this kind of stuff - to keep my 85 yo brain active.